


 System Data Unpacked
macOS calls a large part of your disk System Data, then hides almost everything inside that label. On a developer Mac it can be tens or even hundreds of gigabytes, while Finder and Storage settings offer no useful way to see what is taking the space.
System Data Unpacked opens that bucket. It measures the folders macOS does not attribute to apps, photos or documents, then lets you inspect and remove individual items. The important word is individual: this is a storage inspector, not a button that wipes every cache it can find.
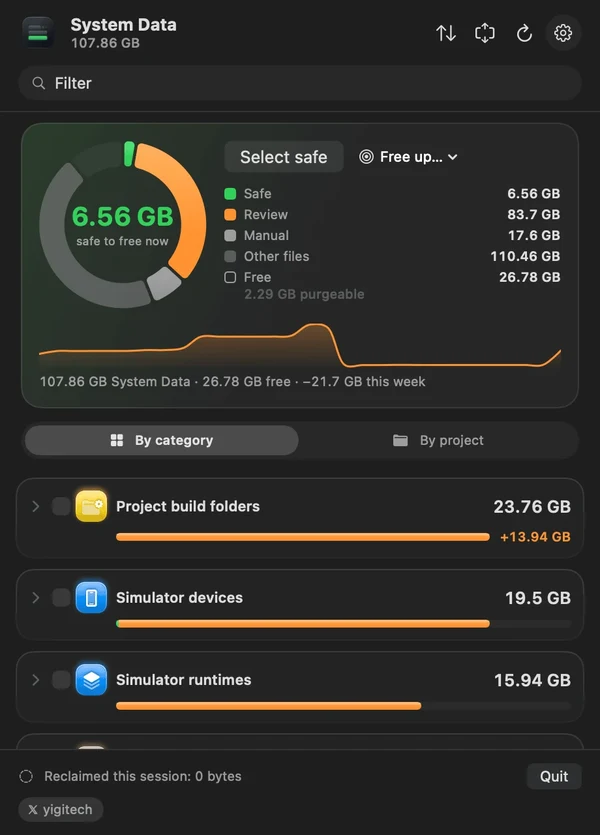
The overview combines the disk rings, System Data total, free space and the largest categories in one scan. The numbers here are from the developer’s Mac, not a promise about yours.
Install and let the first scan finish
The app requires macOS 14 or later. The quickest installation is Homebrew:
brew install --cask Jarvis322/tap/sysdata
You can also download the notarized DMG from the project’s releases page and drag the app into Applications. On first launch, choose whether you want the full window or the menu-bar presentation. The scan starts automatically and results appear as each location is measured, so a slow first scan does not mean the app has frozen.
If some locations cannot be read, open System Settings → Privacy & Security → Full Disk Access, enable System Data Unpacked, then scan again. The app does not install a privileged helper or a background daemon. When an action needs administrator access, it shows the command first and asks for permission at that moment.
Read the ring before deleting anything
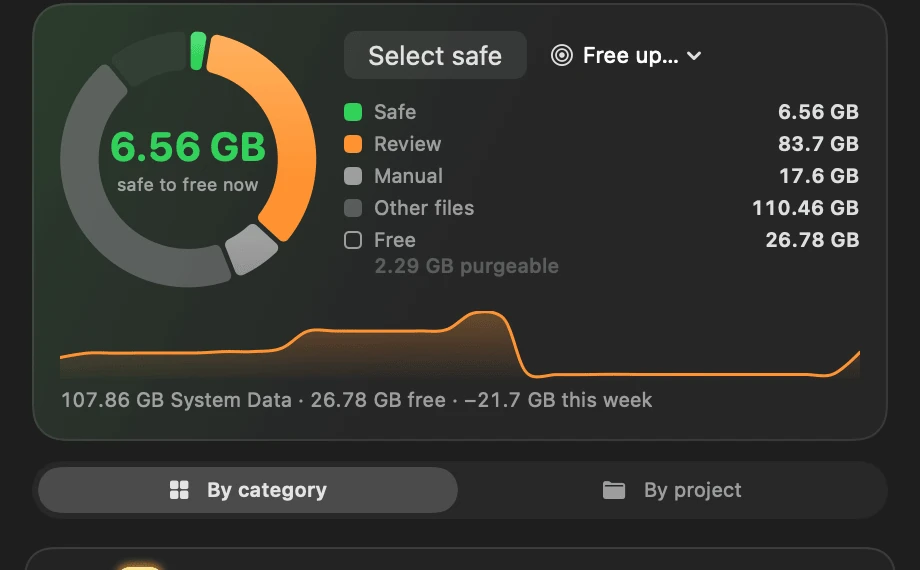
The ring at the top separates the disk into five groups:
| Group | What it means | What to do |
|---|---|---|
| Safe | Regenerates automatically, such as ordinary caches | Usually safe to clear |
| Review | Removable, but rebuilding it costs time or requires a download, login or simulator setup | Inspect before selecting |
| Manual | The app cannot remove it safely | Read the info panel and use the shown command or setting |
| Other files | Files macOS does not classify as System Data | Leave them alone |
| Free | Space currently available | Use it as context, not a target |
The green Safe to free now number is the useful starting point. The orange Review area is where the real decisions are: deleting a simulator runtime or an old project cache can reclaim a lot of space, but you may need to download or rebuild it later.
Safe, Review and Manual are different jobs
Safe items are disposable by design. You can tick several rows, use Select safe, or let the optional weekly clean handle them. Because they regenerate, the app deletes these outright.
Review items are moved to the Trash first. This gives you an undo window, but the space is not reclaimed until the Trash is emptied. That distinction matters when the goal is free disk space rather than a tidy list.
Manual items are informational. The info button shows the path or command because the app will not pretend every folder can be removed with one click.
Do not start with the biggest orange row
The largest Review category is often the one you understand least. Expand it, read the item names and use the idle-time column before selecting anything. A build folder for an abandoned project and one for today’s release can have exactly the same size.
A practical cleanup pass
- Scan, then sort by size. Start with the largest categories, but keep them folded at first. The folded list is a map of where the space went.
- Clear Safe items. Use the selection controls or the weekly clean if you want this to happen automatically. There is no reason to micro-manage regenerating caches.
- Expand one Review category. Check the five largest entries, their last-used information and the short trend line before deciding. Use the search field to narrow a long list by name or group.
- Use By project for developer folders. Project build folders are grouped by project, which is more useful than deleting one giant cache directory and discovering later that an active workspace was inside it.
- Send Review items to the Trash, then verify. Open the Trash after the cleanup and empty it only when you are satisfied. That is the step that actually returns space.
- Leave Manual items until you understand them. The info panel is documentation, not a suggestion to run a command immediately.
The selection survives filtering and folding, and the footer tells you when selected rows are hidden from the current view. That prevents the common mistake of selecting a batch and then filtering it down without realizing the hidden selection is still active.
What the categories look like on a real Mac
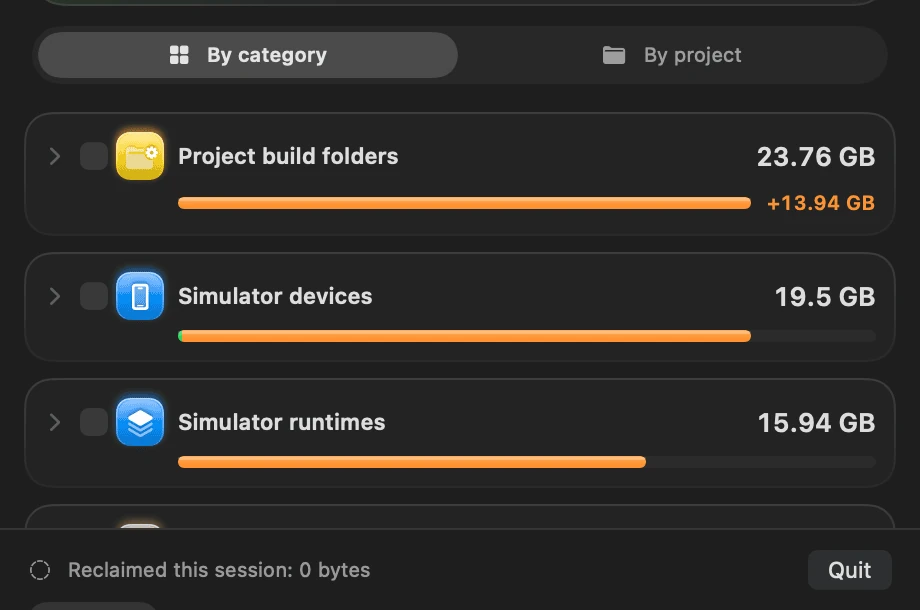
The screenshot above is a typical developer profile: project build folders, simulator devices and simulator runtimes dominate the list. Other Macs will have different names, but the decision process is the same.
Use By category when you want to understand the shape of the problem. Use By project when you want to remove build output without touching the source folders. If a category has grown sharply, select it to see the items that contributed most to the change.
The History view answers a question a single scan cannot: what came back? A cache that is cleared on Monday and back to 12 GB by Friday may be better handled by changing a build setting or retention policy than by clearing it every week.
The header’s purgeable-space figure is only an estimate from macOS. It is not space you can confidently plan around, and the app deliberately does not force macOS to evict data just to make the number move.
Automation without blind deletion
The weekly automatic clean is opt-in and limited to items marked Safe. It does not touch Review items, ask for a password or run while you are watching a scan. That is a narrow automation boundary, and it is the right one for a storage utility.
Update checks are also off by default. If you enable them, the app asks GitHub once a day and verifies the download before replacing the installed copy. Scan history stays on the Mac, and the app does not send your file inventory to a remote service.
Is it worth installing?
System Data Unpacked is most useful if you have already noticed a large System Data line and want evidence before deleting anything. It is less useful as a one-click “clean my Mac” app, because its design deliberately slows down the dangerous decisions.
Start with the safe caches, inspect the expensive Review categories, and use project grouping before touching build output. That workflow is slower than a blind cleaner, but it is much less likely to remove a simulator you still need or a build folder from a project you are about to open.